
European Breakfast Rolls with Step-By-Step Tutorial
This post may contain affiliate links which won’t change your price but will share some commission.
European Breakfast Rolls are a real homemade treat. They’ll require a little kneading and a little patience but the effort is worth it. The list of ingredients is very short and simple. Below you will find a step-by-step walkthrough on how to make these perfectly crusty European Breakfast Rolls. Pair them with butter and some marmalade for a real European experience.

Why did I call them European Breakfast Rolls?
I called these rolls European Breakfast Rolls because this type of roll can be found throughout Europe, from Poland to Germany, to Switzerland and France and so on. Admittedly, the trend has since caught on here in the States, but the phenomenon will always be European to me.
You’ll find that in Europe people often eat rolls for breakfast.; ideally with some butter and jam, fruit preserve or marmalade, or some soft cheeses (like for instance this spreadable goat cheese), or even as a guest star to fried, scrambled or soft boiled eggs.
I’m a fan of all of the above versions, but I especially like mine with just salted butter. I’m not sure what it is…but a fresh roll from the oven, with a smear of salted butter, just tastes heavenly for me. But it’s a personal preference, and I know plenty of people who go for the sweet route, with some unsalted butter and jam – I don’t judge. Regardless, I can guarantee that whatever you choose to put on these rolls, you won’t be able to stop at just one.

These European Breakfast Rolls somehow magically transport me back to childhood breakfasts in my hometown of Wroclaw, Poland. Isn’t it funny how food has a way of doing that? I was even under the misconception that these were known as ‘Wroclaw Rolls.’ As this post probably suggests, they were super delicious!
However, they were way bigger than those I made here, but I wanted to have more small rolls than just a few large ones. But if you’d rather, you can totally make 8 large rolls instead of 16 small ones. Ever since I made my homemade crusty bread in dutch oven, which also reminded me of bread I ate as a child, I’ve had the itch to recreate these Breakfast Rolls, and I am happy with the result.
As mentioned, I decided to make these rolls small. Reason being is because I figured my little boys would prefer this size… and I wasn’t wrong. In fact, my youngest son decided to crash my photography session to steal a buttered piece of roll. Go figure….

So if there’s anyone reading this post who also remembers these rolls from Poland, give me a shout in comments, I’d love to hear from you. Better yet, make these rolls yourself and let me know if they remind you of those from Poland.
Oh and of course, if you’ve never had rolls from Poland or other European countries for that matter, and you’re curious of how they taste, then give this recipe a try and let me know your thoughts.

What ingredients are needed to make these European Breakfast Rolls?
Again, the list of ingredients is very simple:
- Bread flour;
- Active dry yeast;
- Milk;
- Sugar (just a little to activate the yeast);
- Butter;
- Egg; &
- Salt.

Step-By-Step Tutorial on How to Make these European Breakfast Rolls (printable recipe can be found below)
For the yeast starter:
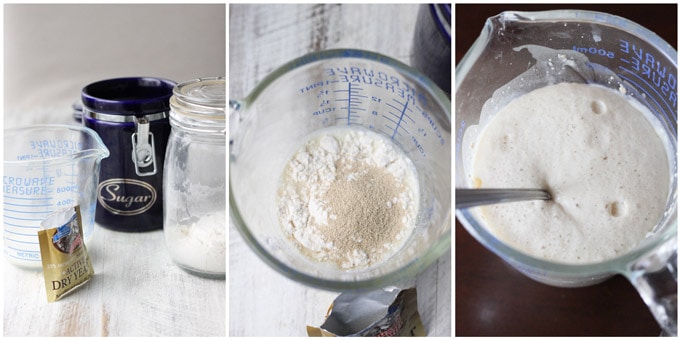
- Gather ingredients for yeast starter: dry active yeast with sugar, flour, and milk; (photo on the left)
- Add a 1/3 cup of milk, 2 teaspoons of sugar, 2 tablespoons of flour and your yeast to a measuring cup or a bowl and mix well; (photo in the middle)
- Set aside for 30-40 minutes until it doubles in size; (photo on the right)
For the dough:
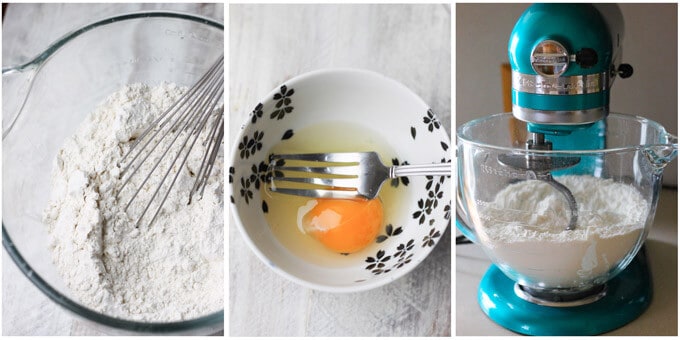
- Add 4.5 cups of flour and 2 teaspoons of salt to your mixing bowl; (photo on the left)
- Then beat one egg and then add 2 tablespoons of melted butter to your dough; (photo in the middle)
- Prepare mixer with your hook attachment for dough (if you have one) – otherwise, prepare yourself for dough mixing session; (photo on the right)
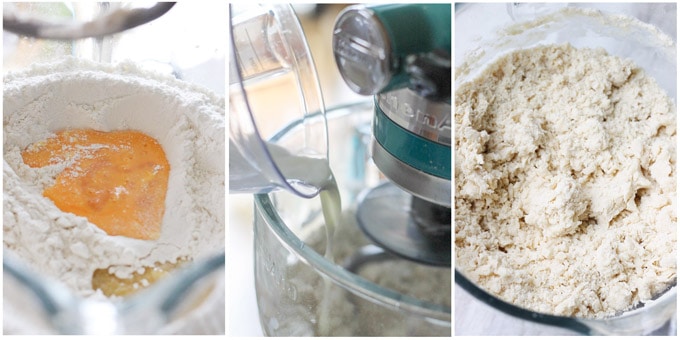
- Add egg, butter and yeast solution (prepared in bullets 1-3 above) to the flour, and mix for a few seconds; (photo on the left)
- Then start adding warm milk (about 1 cup) (photo in the middle) until your dough is moist (photo on the right);
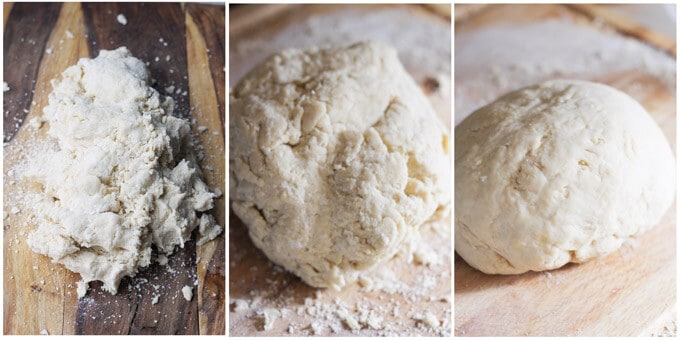
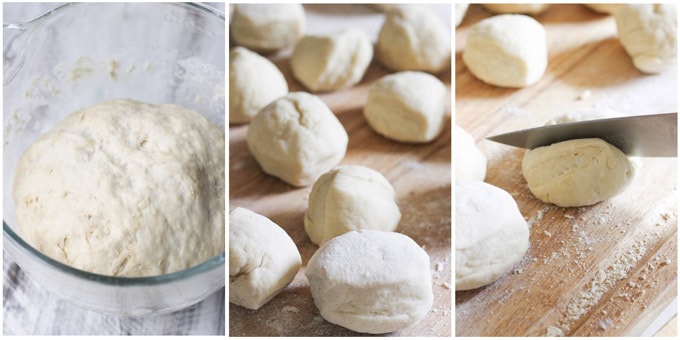
- Place your dough on a board and start kneading it together; (photo on the left and in the middle)
- Knead the dough for about 10 minutes, until the surface is smooth; (photo on the right)
- Place the dough back into the bowl, cover and set aside in a warm place for about an hour (the dough should double in size) (photo on the left);
- Remove the dough from the bowl and place back onto your cutting board. Then form into 16 small or 8 large rolls. Using a sharp knife, I cut the dough into 8 pieces; then I halve each piece to form the proper amount of dough for 16 balls. Caution: be careful to not over-knead the dough, as you may lose the air and the rolls could become dense inside; (photo in the middle)
- Using a knife, cut make a cut into each roll, almost to the bottom of it; (photo on the right)
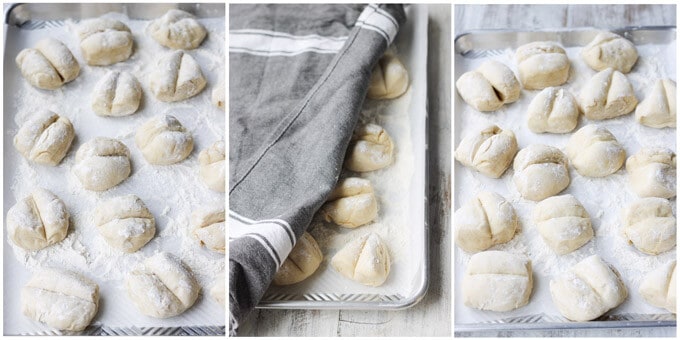
- Place the rolls onto a floured sheet pan with parchment paper. Make sure they are floured on all sides. (photo on the left)
- Then cover them with a kitchen towel and then let them rise for another hour (photo in the middle)- they will grow and become more fluffy (photo on the right);
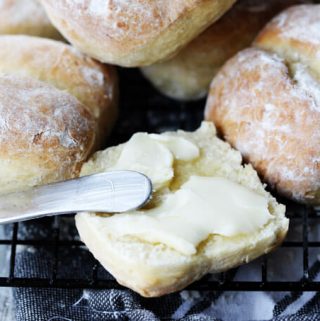
- Bake the rolls in a preheated 425F oven, on the middle rack, for about 20-25 minutes, or until they’re golden brown on top;
- Let the rolls cool off and serve with butter or your choice of condiment!


You can serve these European Bread Rolls with these awesome dishes:
Horiatiki Salad – it’s so good to dunk the bread in the greek salad sauce;
Mediterranean Chicken Stew with Sweet Potatoes, Beans & Olives
If you’re looking for some more sweet version of these rolls, try to make these sweet jams:
Orange Marmalade from Mon Petit Four
Strawberry Preserve from Martha Stewart
European Breakfast Rolls
Ingredients
Starter
- 1/3 cup Milk warm
- 1 package Dry Active Yeast about 2.5 teaspoon
- 2 tbsp Bread Flour
- 2 teaspoon Sugar
Dough
- 4.5 cups Bread Flour
- 2 teaspoon Salt
- 1 Egg beaten
- 2 tbsp Butter unsalted, melted
- Starter
- 1 cup Milk warm
Instructions
For the yeast
- Gather ingredients for yeast starter: dry active yeast with sugar, flour and milk;
- Add a 1/3 cup of milk, 2 teaspoons of sugar, 2 tablespoons of flour and your yeast to a measuring cup or a bowl and mix well;
- Set aside for 30-40 minutes until it doubles in size;
For the dough
- Add 4.5 cups of flour and 2 teaspoons of salt to your mixing bowl;
- Then beat one egg and then add 2 tablespoons of melted butter to your dough;
- Prepare mixer with your hook attachment for dough (if you have one) - otherwise, prepare yourself for a dough mixing session;
- Add egg, butter and yeast solution (prepared in bullets 1-3 above) to the flour, and mix for a few seconds;
- Then start adding warm milk (about 1 cup) until your dough is moist;
- Place your dough on a board and start kneading it together;
- Knead the dough for about 10 minutes, until the surface is smooth;
- Place the dough back into the bowl, cover and set aside in a warm place for about an hour (the dough should double in size)
- Remove the dough from the bowl and place back onto your cutting board. Then form into 16 small, or 8 large rolls. Using a sharp knife, I cut the dough into 8 pieces; then I halve each piece to form the proper amount of dough for 16 balls. Caution: be careful to not over-knead the dough, as you may lose the air and the rolls could become dense inside;
- Using a knife, cut make a cut into each roll, almost to the bottom of it;
- Place the rolls onto a floured sheet pan with parchment paper. Make sure they are floured on all sides. Then cover them with a kitchen towel and then let them rise for another hour - they will grow and become more fluffy;
- Bake the rolls in a preheated 425F oven, on the middle rack, for about 20-25 minutes, or until they’re golden brown on top;
- Let the rolls cool off and serve with butter or your choice of condiment!
Nutrition
Read about the author Edyta here or follow Eating European on social media: Facebook, Instagram, Pinterest, and Twitter.


Oh my goodness these are delightful! I can almost taste them through the computer screen, so fresh and flaky, but crusty and warm. My grandmother is Polish and she made us so many traditional polish foods growing up, but I don’t remember these specifically. Now I need to ask her about them. I love when food connects people through history. It’s amazing that way, isn’t is?
It is amazing! So happy to hear that your grandmother is Polish. Ask her about these rolls. I’m curious if she remembers them too.
These rolls look perfect, I remember eating something similar on a European vacation. Can’t wait to make them for my family this weekend!
I hope you will like them Sara 🙂
Just pinned this gorgeous recipe…and you have given me bread roll goals! I love it that you’re using a starter, because as a former baker, I know the quality it lends to any baked goods! Can’t wait to try this one out sometime…thanks for the recipe inspiration 🙂
Thank you so much Traci. Let me know how they come out for you 🙂
These rolls are making my mouth water! Your son is adorable btw 🙂
Thank you Amanda! 🙂
My (German) great grandmother made something that looked like these rolls… I don’t remember what they tasted like because I was pretty young when she passed away, but I remember loving them. I can’t wait to try these and see if they jog my memory!
Thanks Rae. I hope you will like them 🙂
fabulous instructions thank you so much for sharing such a beautiful recipe and that baby is gorgeous!
Thank you so much Claudia 🙂
Just had to say your instructions are amazing! So many blog posts leave me wondering if I’m doing something right. I love all of the pictures that walk you through so thoroughly. Excited to make these next week 🙂
Thank you so much, Emma! I really appreciate your feedback. I’m trying to make my recipes as easy to follow as possible. I’m so happy that you found useful 🙂
I made these roll just a few minutes ago and they look great in the outside. some kind of hard because I believe the temperature of the oven is very strong. 425F for 20 minutes… It should be 375 or 350. Some kind of salty too. MY oven is Samsung and is 7 years old. just in case. Eating one right , not bad ,but the bottom is some burned. It could be because I put some flour in the pan?? Not really fluffy but eatable.
Hi Edyta,
I just made your rolls and they are delicious! I grew up with this taste so I am really happy I came across your blog. Out of curiosity – how do you make your rolls square? When I took the dough out of the call it was totally round so I cut it like pizza and then I had to work on it a bit to make them round. Also, the dough dried a bit on top while it was rising (I had it covered with a cloth but it didn’t seem to help all that much) so I would have to work on it some even if it wasn’t for the shape. How did you do it that yours did not dry?
Try covering them with plastic wrap. It might help.
Making double portion now for the first time. All by hand. Dough is resting. Hope to see it doubled in size in 45 minutes.
This is one of the best and easiest bread rolls ever. Since I found it a month ago, I’ve made it every week, double portion, 12 rolls per portion, making 24 rolls that last 2 days with my family.
hello from Sweden. I am in Wroclaw a lot and yes, taste just like yours =) big thanks for the recipe =) !!!
Great. thanks!
Dough came out too stiff. You should list ingredients in grams not cups.